Azure Red Hat OpenShift Operations Guide
This content is authored by Red Hat experts, but has not yet been tested on every supported configuration. This guide has been validated on OpenShift 4.20. Operator CRD names, API versions, and console paths may differ on other versions.
Azure Red Hat OpenShift Operations Guide
Day 1 Deployment & Day 2 Operations
Table of Contents
- Introduction
- Quick Reference
- Part 1: Pre-Deployment Planning
- Part 2: Cluster Deployment (Day 1)
- Part 3: Day 2 Operations
- Part 4: Operational Excellence (Day N)
- Appendices
Introduction
This technical guide provides comprehensive guidance for planning, deploying, and operating Azure Red Hat OpenShift (ARO) clusters. Whether you’re deploying your first ARO cluster or managing production workloads, this guide covers the essential tasks and best practices for successful operations.
Purpose of This Guide
This guide is designed to:
- Provide a structured approach to ARO cluster deployment and operations
- Establish best practices for production-ready ARO environments
- Serve as a reference for day-to-day operational tasks
- Guide troubleshooting and problem resolution
- Support both initial deployment (Day 1) and ongoing operations (Day 2 and beyond)
Who Should Use This Guide
This guide is intended for:
- Cloud Architects planning ARO deployments
- Platform Engineers deploying and configuring ARO clusters
- Site Reliability Engineers (SREs) operating ARO environments
- DevOps Engineers integrating ARO with CI/CD pipelines
- Security Teams implementing security controls and compliance
How to Use This Guide
The guide is organized chronologically to match the ARO lifecycle:
- Pre-Deployment Planning - Review prerequisites, plan architecture, and make design decisions
- Day 1 Deployment - Deploy infrastructure and create your ARO cluster
- Day 2 Operations - Configure, secure, and integrate your cluster (organized by priority tier)
- Day N Operations - Maintain and optimize your production environment
- Appendices - Deep dives on specialized topics and comprehensive troubleshooting
Checkboxes throughout the guide indicate actionable tasks. Use them to track your progress through deployment and configuration.
Priority Tiers in Day 2 Operations help you focus:
- Tier 1 (Critical): Essential operations required for production readiness
- Tier 2 (Standard): Recommended operations for robust production environments
- Tier 3 (Optional): Enhancements for specific use cases
Document Conventions
| Convention | Meaning |
|---|---|
| - [ ] Checkbox | Actionable task or verification step |
code block |
Commands to execute or configuration snippets |
| IMPORTANT | Critical information requiring special attention |
| ⚠️ Warning | Actions that can cause issues if not carefully followed |
| 💡 Tip | Helpful suggestions and best practices |
| 📚 Reference | Links to additional documentation |
Quick Reference
Essential Commands
Critical Prerequisites Checklist
- Azure subscription with 40+ available vCPU quota
-
Microsoft.RedHatOpenShiftresource provider registered - Azure CLI version 2.30.0 or later installed
- Red Hat pull secret obtained (recommended)
- Network architecture planned (VNet, subnets, IP ranges)
- Identity strategy selected (Managed Identity strongly recommended)
- Cluster visibility decision made (Private vs Public)
Resource Requirements (Minimum)
| Resource | Minimum | Recommended |
|---|---|---|
| vCPU Quota | 40 cores | 60+ cores |
| VNet CIDR | /26 | /24 or larger |
| Master Subnet | /27 (32 IPs) | /26 (64 IPs) |
| Worker Subnet | /27 (32 IPs) | /24 (256 IPs) |
| Master Nodes | 3x Standard_D8s_v5 | 3x Standard_D16s_v5 |
| Worker Nodes | 3x Standard_D4s_v5 | 6x Standard_D8s_v5 or larger |
Contacts & Resources
| Resource | Link/Contact |
|---|---|
| ARO Documentation | https://docs.microsoft.com/azure/openshift/ |
| OpenShift Documentation | https://docs.openshift.com/ |
| Red Hat Cloud Experts ARO Tutorials | https://cloud.redhat.com/experts/tags/aro/ |
| Microsoft Support | Azure Portal > Support |
| Red Hat Support | https://access.redhat.com/ |
| ARO Resource Provider GitHub | https://github.com/Azure/ARO-RP |
Part 1: Pre-Deployment Planning
Proper planning is essential for a successful ARO deployment. This section covers all the decisions and prerequisites you need to address before creating your cluster.
Prerequisites & Requirements
Azure Subscription Requirements
-
Verify Core Quota
- Minimum: 40 vCPU cores (3x D8s_v5 masters + 3x D4s_v5 workers)
- Recommended: 60+ vCPU cores for production workloads
- Consider future scaling requirements
-
Register Azure Resource Providers
-
Verify Required Permissions
For the user/service principal deploying the cluster:
- Contributor role on the cluster resource group
- User Access Administrator role on the cluster resource group
- Network Contributor role on the VNet resource group (if different)
Tools Installation
-
Azure CLI (version 2.84 or later)
-
OpenShift CLI (oc)
-
kubectl (optional, for Kubernetes-native commands)
Note: The
ocCLI includeskubectlfunctionality, so separate installation is typically not needed.If you need standalone kubectl:
-
Other Useful Tools
jq- JSON processing (for parsing Azure CLI output)git- For GitOps workflowshelm- For Helm chart deploymentsterraform- If using Infrastructure as Code
Red Hat Integration
-
Obtain Red Hat Pull Secret (Strongly Recommended)
Why it’s important:
- Provides access to Red Hat Operator Hub and certified operators
- Enables access to Red Hat Container Registry
- View ARO clusters and accelerate issue resolution by opening support cases directly through the Red Hat Hybrid Cloud Console.
- Free with Red Hat account
How to obtain:
- Create a Red Hat account at https://console.redhat.com/
- Navigate to https://console.redhat.com/openshift/install/pull-secret
- Download your pull secret
- Save as
pull-secret.txt
-
Access to Red Hat Hybrid Cloud Console
- Account creation: https://console.redhat.com/
- Useful for cluster insights, vulnerability scanning, and support
Identity & Access Strategy
CRITICAL DECISION: Choose your identity model for the ARO cluster. Managed Identity is strongly recommended for all new deployments.
Decision: Managed Identity vs Service Principal
| Factor | Managed Identity (RECOMMENDED) | Service Principal (Legacy) |
|---|---|---|
| Credential Management | ✅ No long-lived credentials | ❌ Manual - requires rotation |
| Security | ✅ Short-lived OIDC tokens | ❌ Long-lived secrets |
| Role Assignments | ARO built-in roles (least privilege) | Broad Contributor roles |
| Setup | Create identities + assign roles before cluster creation | Create SP + assign roles before cluster creation |
| Expiration | ✅ Tokens auto-rotate | ❌ Credentials expire, need rotation |
| Operational Overhead | ✅ Low (no credential rotation) | ❌ High (credential lifecycle) |
| Production Readiness | ✅ Recommended | ⚠️ Not recommended |
Option 1: Managed Identity (RECOMMENDED)
Overview:
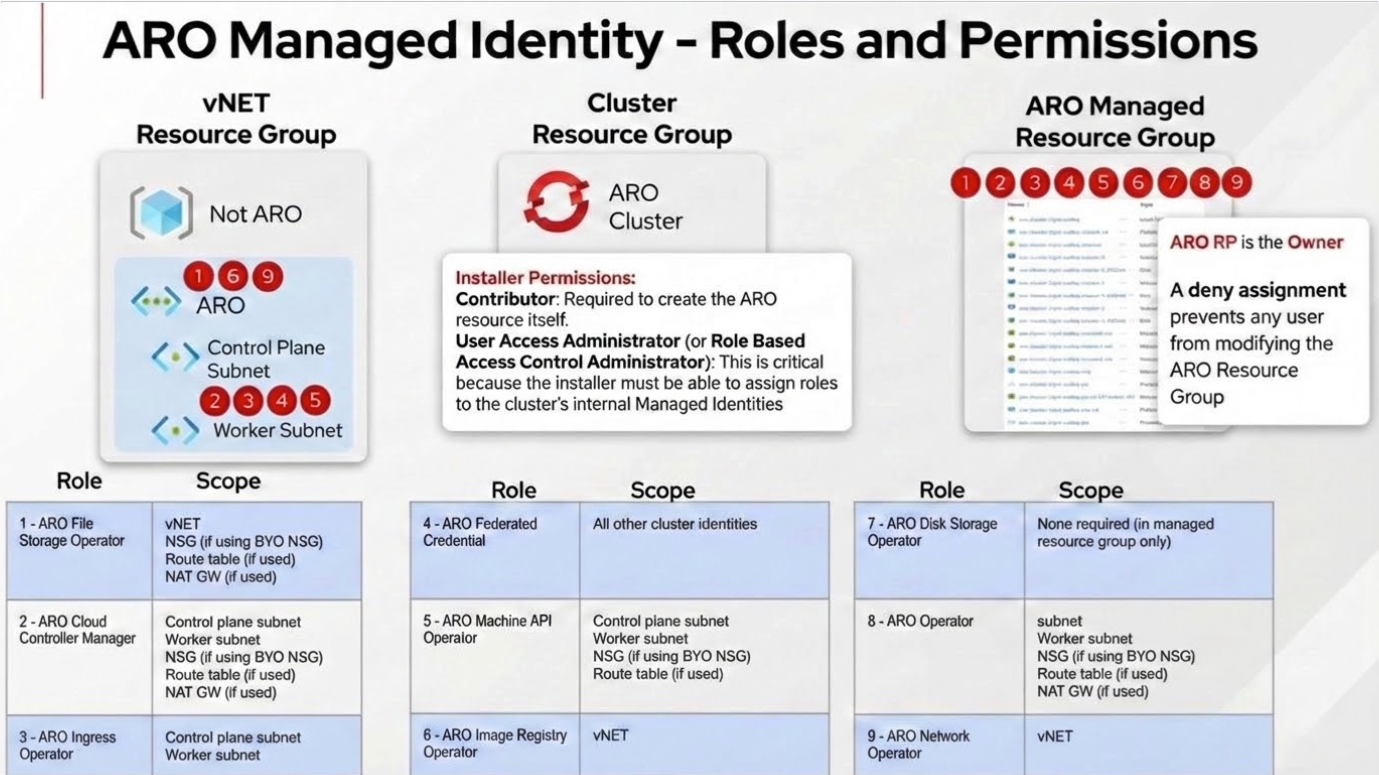
- ARO uses 9 user-assigned managed identities (1 cluster identity + 8 platform workload identities)
- You create the identities and assign ARO built-in roles before cluster creation
- ARO operators use these identities with workload identity/federated credentials
- No long-lived credentials to manage or rotate
- Follows principle of least privilege with operator-specific roles
Architecture:
Setup Requirements:
⚠️ CRITICAL: You must complete these steps before cluster creation:
-
Create 9 user-assigned managed identities: 1 cluster identity (
aro-cluster) + 8 platform workload identities (one per operator listed above) -
Assign ARO built-in roles to each identity:
- Cluster identity →
Azure Red Hat OpenShift Federated Credentialrole on all 8 operator identities - Each operator identity → operator-specific ARO built-in role at subnet or VNet scope:
Azure Red Hat OpenShift Cloud Controller ManagerAzure Red Hat OpenShift Cluster Ingress OperatorAzure Red Hat OpenShift Machine API OperatorAzure Red Hat OpenShift Network OperatorAzure Red Hat OpenShift File Storage OperatorAzure Red Hat OpenShift Image Registry OperatorAzure Red Hat OpenShift Service Operator
- Cluster identity →
-
Use
--enable-managed-identityand--assign-*flags during cluster creation to reference the identities
Complete setup instructions:
Benefits:
- ✅ No service principal required - eliminates long-lived credential management
- ✅ Short-lived tokens only - workload identity uses federated credentials (OIDC tokens)
- ✅ Least privilege access with operator-specific ARO built-in roles
- ✅ No credential rotation required
- ✅ Significantly better security posture
- ✅ Recommended for all production environments
Option 2: Service Principal (Legacy, Not Recommended)
Only use if managed identity is not an option due to specific organizational constraints.
Setup Requirements:
- Create Azure AD service principal with
Contributorrole - Assign roles to VNet resource group and network resources
- Securely store credentials in Azure Key Vault
- Establish credential rotation process (default expiration: 1 year)
See: Service Principal Setup Guide
Drawbacks:
- ❌ Requires manual credential rotation
- ❌ Credentials can be leaked if not properly secured
- ❌ Broader permissions than necessary (Contributor role vs. operator-specific roles)
- ❌ Increased operational overhead
- ❌ More operational overhead
Network Architecture Planning
ARO clusters require careful network planning. This section helps you design your network topology.
A great getting starting reference is the ARO Landing Zone Accelerator
Network Topology Decisions
-
Choose Network Topology
Option A: Single VNet (Simpler)
- ARO cluster and all resources in one VNet
- Easier to manage
- Suitable for: Development, testing, small deployments
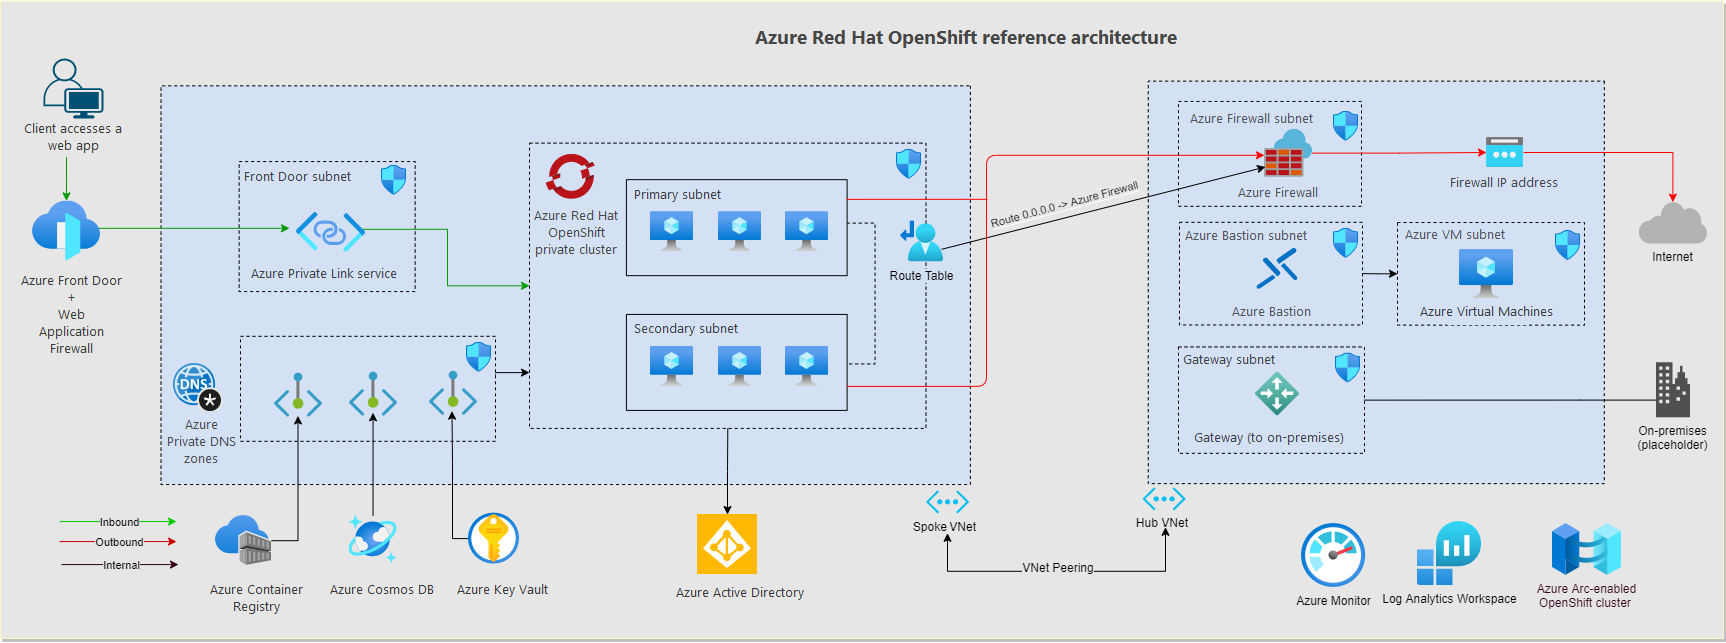
Option B: Hub-Spoke Topology (Enterprise)
- Hub VNet contains shared services (firewall, VPN gateway, DNS)
- Spoke VNet contains ARO cluster
- VNet peering connects hub and spoke
- Suitable for: Production, multi-cluster, enterprise environments
ARO Landing Zone Accelerator Architecture
-
Choose Cluster Visibility
Visibility API Server Ingress (*.apps) Use Case Private (Recommended) Private IP Private IP Production, enterprise, security-sensitive Public Public IP Public IP Development, testing, demos Private Cluster Considerations:
- Requires VPN, ExpressRoute, or Azure Bastion for access
- API server only accessible from VNet or peered networks
- Applications not directly exposed to internet (use Azure Front Door or App Gateway)
- Recommended for all production deployments
Public Cluster Considerations:
- API server and applications publicly accessible
- Easier initial setup
- Only recommended for sandbox/development environments
-
Choose Egress/Outbound Connectivity Strategy
Option Description Use Case LoadBalancer (Default) Public IP on Azure Load Balancer Simple deployments, development UserDefinedRouting (UDR) Custom route table, typically via firewall/NVA Production, controlled egress, security compliance Azure Firewall Managed firewall service Enterprise, centralized security, logging NAT Gateway Dedicated outbound connectivity High-throughput scenarios, predictable IPs Egress Lockdown Feature:
- ARO clusters with Egress Lockdown enabled do NOT need direct internet access
- All required Azure/Red Hat connections are proxied through the ARO service
- Endpoints proxied automatically (no firewall rules needed):
arosvc.azurecr.io- System container imagesmanagement.azure.com- Azure APIslogin.microsoftonline.com- Authentication- Geneva monitoring endpoints
- Optional endpoints for additional features (require firewall allowlist):
registry.redhat.io,quay.io- Red Hat operators from OperatorHubcert-api.access.redhat.com- Red Hat Telemetry (opt-in only)api.openshift.com- Check for cluster updates
- See Egress Restrictions for detailed endpoint list
UserDefinedRouting (UDR) for Private Clusters without Public IP:
- Create fully private cluster with NO public IP address
- Requires
--outbound-type UserDefinedRoutingduring cluster creation - MUST pre-configure route table with proper routes to Azure endpoints
- Only works with
--apiserver-visibility Privateand--ingress-visibility Private - Customer is fully responsible for egress routing (ARO cannot manage it)
- Supports configuring egress IPs per namespace/pod
- See Private Cluster without Public IP for implementation
IP Address Planning
CRITICAL: Plan IP address ranges carefully. Overlapping ranges cause connectivity issues.
-
Plan VNet and Subnet CIDRs
Resource Minimum Size Recommended Size Example CIDR VNet /26 (64 IPs) /16 (65,536 IPs) 10.0.0.0/16 Master Subnet /27 (32 IPs) /26 (64 IPs) 10.0.0.0/26 Worker Subnet /27 (32 IPs) /24 (256 IPs) 10.0.1.0/24 Master Subnet Sizing:
- Minimum 3 master nodes
- Each master has 1 primary IP + potential for additional IPs
- Plan for Azure reserved IPs (first 4 and last 1 in each subnet)
Worker Subnet Sizing:
- Initial: Minimum 3 worker nodes
- Scaling: Plan for autoscaling (e.g., up to 100 nodes)
- Each node: 1 primary IP
- Load balancers: Additional IPs needed
-
Optional: Plan Multiple Worker Subnets for Node Segregation
You can deploy worker nodes across multiple subnets to achieve workload isolation, security segmentation, or compliance requirements.
Use Cases:
- Security zones: Separate PCI-compliant workloads from general workloads
- Network policies: Different firewall rules per subnet
- Bandwidth/performance: Dedicated network paths for specific workloads
- Compliance: Physical/logical separation of regulated data
Architecture Example:
Implementation:
- Create multiple subnets in your VNet before cluster deployment
- Deploy default worker MachineSet to first subnet during cluster creation
- After cluster creation, create additional MachineSets targeting other subnets
- Use node selectors/taints to schedule workloads to specific subnets
Important Considerations:
- All worker subnets must meet minimum /27 size requirement
- Each subnet needs service endpoints for Microsoft.ContainerRegistry
- NSG rules (if using BYO NSG) must be configured for all worker subnets
- Managed identity permissions apply to all subnets
Complete guide: Segregate MachineSets Across Subnets
-
Plan OpenShift Network CIDRs
Network Default Must Not Overlap With Pod CIDR 10.128.0.0/14 VNet, Peered VNets, On-Premises Service CIDR 172.30.0.0/16 VNet, Peered VNets, On-Premises Pod CIDR:
- Must be minimum /18 or larger
- Default provides 16,384 pod IPs
- Cannot be changed after cluster creation
Service CIDR:
- Must be minimum /18 or larger
- Default provides 65,536 service IPs
- Cannot be changed after cluster creation
Avoid using the following CIDR ranges for pod and service networks as they conflict with OVN-K:
100.64.0.0/16 100.88.0.0/16
-
Verify No IP Overlap
Check for overlaps between:
- VNet CIDR ↔ On-premises networks
- VNet CIDR ↔ Peered VNets
- Pod CIDR ↔ VNet/Peered VNets/On-premises
- Service CIDR ↔ VNet/Peered VNets/On-premises
Common Overlap Issues:
- Default Pod CIDR (10.128.0.0/14) overlaps with on-prem 10.0.0.0/8
- Default Service CIDR (172.30.0.0/16) overlaps with common VPN ranges
- Solution: Use non-standard CIDRs like 100.64.0.0/14 for pods
Connectivity Planning
-
Plan Inbound Connectivity (for private clusters)
Option Use Case Setup Complexity Point-to-Site VPN Individual developer access Low Site-to-Site VPN Office/datacenter connectivity Medium ExpressRoute Dedicated, high-bandwidth connection High Azure Bastion Jump box access (no VPN client needed) Low - See Optional: Private Cluster Access for setup details
-
Plan Application Exposure (for private clusters)
Option Use Case Azure Front Door Global load balancing, WAF, SSL offload, caching Azure Application Gateway Regional load balancing, WAF, path-based routing OpenShift Route Simple HTTP/HTTPS exposure (internal only for private clusters)
Network Security Groups
DECISION POINT: ARO-managed NSG vs. Bring Your Own NSG (BYO NSG)
Decision: ARO-Managed NSG vs BYO NSG
-
Choose NSG Management Model
Factor ARO-Managed NSG (RECOMMENDED) BYO NSG Setup Complexity ✅ Minimal - ARO creates and manages ❌ Complex - pre-create and configure Operational Overhead ✅ Low - ARO maintains rules ❌ High - manual rule management Compliance Suitable for most environments Required if pre-creation mandated Customization Limited (ARO controls) Full control over rules Risk of Misconfiguration ✅ Low ⚠️ High - can break cluster Recommendation:
- Use ARO-managed NSG unless compliance/governance requires pre-creation
- ARO automatically creates NSGs and maintains required rules
- Reduces operational burden and configuration errors
If Using BYO NSG
⚠️ WARNING: Misconfigured NSGs can prevent cluster deployment or cause operational issues.
For complete BYO NSG setup, see Appendix A: Network Security Groups Deep Dive
Summary of Requirements:
- Pre-create NSGs before cluster deployment
- Attach to master and worker subnets (not individual NICs)
- Configure all required ARO service tag rules
- Never delete or modify ARO-required rules (priorities 500-3000)
- Identity permissions:
- With Managed Identity: ARO built-in roles automatically assigned (no action needed)
- With Service Principal: Manually assign Network Contributor role
Cluster Configuration Planning
Cluster Sizing
-
Plan Master Node Configuration
Scenario VM Size vCPU Memory Notes Minimum Standard_D8s_v5 8 32 GB Required minimum Production Standard_D16s_v5 16 64 GB Recommended Large Scale Standard_D32s_v5 32 128 GB For very large clusters - Master nodes: Always 3 nodes (fixed, cannot be changed)
- Control plane etcd and API server run on master nodes
- Cannot be scaled horizontally after creation
- Vertical scaling (resize) possible through a support case
-
Plan Worker Node Configuration
For complete list of supported instances see ARO Support Policies
| Workload Type | VM Size | vCPU | Memory | Example Use Case |
|---|---|---|---|---|
| General Purpose | Standard_D4s_v5 | 4 | 16 GB | Web apps, APIs, microservices |
| Compute Intensive | Standard_F8s_v2 | 8 | 16 GB | Batch processing, analytics |
| Memory Intensive | Standard_E8s_v5 | 8 | 64 GB | Databases, in-memory caches |
| GPU Workloads | Standard_NC6s_v3 | 6 | 112 GB | ML training, inference |
-
Minimum: 3 worker nodes recommended
-
Can be scaled after cluster creation
-
Consider autoscaling requirements
-
Mix VM sizes using multiple MachineSets if needed
-
GPU Planning (if required)
ARO supports GPU workloads:
- NC-series VMs (NVIDIA GPUs)
- Requires NVIDIA GPU Operator
- Requires NVIDIA device plugin
- Plan for GPU node pools separate from general compute
See Tier 3: AI/ML and Advanced Workloads for GPU setup
Version Selection
-
Choose OpenShift Version
Version Selection Strategy:
- Use latest stable version for new deployments
- For production: Use n-1 version (one behind latest) for proven stability
- Check ARO lifecycle for support windows
- Plan for regular upgrades (quarterly recommended)
Domain Configuration
-
Decide: Custom Domain vs Default Domain
Option Format Use Case Default Domain <random>.aroapp.ioQuick setup, development, testing Custom Domain apps.mycompany.comProduction, branded URLs Custom Domain Requirements:
- Control over DNS zone
- Ability to create A records
- Custom TLS certificates (or use cert-manager)
- Post-deployment configuration required
See Optional: Custom Domain Configuration for setup
Storage Planning
Storage Requirements Assessment
- Identify Storage Needs
Application Type Storage Type Performance Tier Stateless apps None required N/A Databases Block storage (Azure Disk) Premium SSD Shared files File storage (Azure Files) Premium or Standard Large objects Blob storage (Azure Blob) Hot/Cool tier High IOPS Ultra Disk or managed Lustre Ultra performance
Default Storage Classes
ARO includes these storage classes by default:
| Storage Class | Provisioner | Use Case | Reclaim Policy |
|---|---|---|---|
managed-csi |
Azure Disk CSI | General purpose block storage | Delete |
managed-premium |
Azure Disk CSI | High-performance block storage | Delete |
azurefile-csi |
Azure Files CSI | Shared file storage (RWX) | Delete |
Note: With managed identities enabled, the default azurefile StorageClass is disabled. Create custom StorageClass if needed.
-
Plan Additional Storage (if required)
Azure Files CSI Driver:
- ReadWriteMany (RWX) access mode
- Shared across multiple pods
- Suitable for shared application data
Azure Blob CSI Driver:
- Large object storage
- Mounting blob containers as volumes
- Suitable for ML datasets, media files
OpenShift Data Foundation (ODF):
- Software-defined storage on ARO
- Block, file, and object storage
- Self-contained storage solution
NetApp Files:
- Enterprise NFS storage
- High performance and features
- Requires NetApp account
Encryption Planning
-
Plan Disk Encryption
Option A: Azure Managed Keys (Default)
- Microsoft-managed encryption keys
- No additional configuration
- Enabled by default
Option B: Customer-Managed Keys (BYOK/CMK)
- Full control over encryption keys
- Requires Azure Key Vault with purge protection
- Encrypts both OS disks and data disks
- CRITICAL: Customer responsible for key maintenance - key loss = cluster failure
- Cannot be enabled on existing clusters (master nodes only for new clusters)
- See Encryption with Customer-Managed Keys for implementation
- Requires Disk Encryption Set
To use CMK:
See Encrypt OS disks with a customer-managed key on Azure Red Hat OpenShift for details
Compliance & Governance
Azure Policy
-
Plan Policy Enforcement
Common policies for ARO:
- Enforce resource tagging
- Require specific Azure regions
- Enforce encryption at rest
- Require diagnostic logging
- Prevent public IP creation
Tagging Strategy
-
Define Resource Tags
Tag Key Example Value Purpose Environment Production, Development, Test Environment classification CostCenter IT-001, Engineering-002 Chargeback/showback Owner teamname@company.com Accountability Application myapp Application grouping Criticality Critical, High, Medium, Low SLA/support tier -
Azure Policy to tag ARO resources
Use Azure Policy to Tag ARO resources
Backup and DR Planning
-
Plan Backup Strategy
What to back up:
- Persistent Volumes (application data)
- Cluster configuration (GitOps recommended)
- Application manifests
Backup tools:
- OpenShift API for Data Protection (OADP) - Recommended
- Velero (underlying OADP technology)
- Azure Backup (for Azure-native backups)
Backup frequency:
- PVs: Based on RPO requirements (e.g., every 6 hours)
- Configuration: On every change (GitOps)
-
Plan Disaster Recovery
DR Strategies:
- Backup/Restore: Restore cluster in different region
- Active/Passive: Standby cluster in DR region
- Active/Active: Multi-cluster with traffic distribution
RPO/RTO targets:
- Recovery Point Objective (RPO): Maximum acceptable data loss
- Recovery Time Objective (RTO): Maximum acceptable downtime
- Document requirements and align backup strategy
Part 2: Cluster Deployment (Day 1)
This section guides you through the actual deployment of your ARO cluster.
Pre-Deployment Verification
Before creating your cluster, verify prerequisites:
- Verify Azure CLI authentication (
az account show) - Verify Azure CLI version (2.84 or later)
- Create resource groups for cluster and VNet (if separate)
- Verify managed identities created (if using managed identity)
Network Infrastructure Deployment
VNet and Subnets Creation
Create a Virtual Network with two dedicated subnets for ARO:
Requirements:
- VNet: Any CIDR that doesn’t overlap with existing networks (e.g., 10.0.0.0/16)
- Master Subnet:
- Minimum /27 (32 IPs)
- Service endpoint for Microsoft.ContainerRegistry
- Private link service network policies must be disabled
- Worker Subnet:
- Minimum /27 (32 IPs), recommended /24 for scaling
- Service endpoint for Microsoft.ContainerRegistry
Deployment:
- ARO with Managed Identities with AZ CLI
- Terraform Examples (includes VNet configuration)
BYO NSG Configuration (Optional)
⚠️ Skip this section if using ARO-managed NSG (recommended)
If bringing your own NSG:
- Create NSGs for master and worker subnets
- Configure required security rules (master ↔ worker communication, Azure service tags, ingress traffic)
- Attach NSGs to subnets
- Grant ARO identity permissions on NSGs (with managed identity, ARO built-in roles handle this automatically)
Complete NSG requirements: See Appendix A: Network Security Groups Deep Dive
ARO Cluster Creation
Choose your deployment method based on your infrastructure-as-code preferences and organizational standards.
Deployment Methods
| Method | Best For | Complexity | Documentation |
|---|---|---|---|
| Terraform | Production, Infrastructure-as-Code, Repeatable deployments | Medium | Red Hat MOBB Examples |
| Azure CLI | Quick deployments, Testing, Manual workflows | Low | Microsoft Docs |
| ARM/Bicep | Azure-native IaC, Integration with Azure DevOps | Medium | Microsoft Docs |
| Azure Portal | First-time users, Visual workflow | Low | Portal Quickstart |
Option 1: Terraform (Recommended for Production)
Prerequisites:
- Terraform >= 1.14.8
- Azure CLI authenticated (
az login) - Managed identities and role assignments created (see Identity & Access Strategy )
Red Hat MOBB Terraform Examples:
The Red Hat MOBB team provides production-ready Terraform modules with various configurations:
📚 Repository: https://github.com/rh-mobb/terraform-aro
Available Examples:
private-cluster- Private ARO with managed identitiespublic-cluster- Public ARO cluster (dev/test)byovnet- Bring your own VNetcustom-domain- ARO with custom domainmultiple-machinepools- Multiple worker node pools
Quick Start:
Official Terraform Provider:
📚 Provider Documentation: https://registry.terraform.io/providers/hashicorp/azurerm/latest/docs/resources/redhat_openshift_cluster
Minimal Example:
For Managed Identity Configuration, see the Red Hat MOBB examples which include complete managed identity setup.
Option 2: Azure CLI
For detailed CLI deployment steps with all parameters and options, see:
📚 Official Guide: https://learn.microsoft.com/en-us/azure/openshift/howto-create-openshift-cluster
Quick Command Reference:
Common Optional Parameters:
Complete CLI deployment guide: https://learn.microsoft.com/en-us/azure/openshift/howto-create-openshift-cluster
Option 3: ARM Template / Bicep
For declarative infrastructure deployment integrated with Azure DevOps or Azure Pipelines:
📚 Official Guide: https://learn.microsoft.com/en-us/azure/openshift/quickstart-openshift-arm-bicep-template
Quick Deploy:
Option 4: Azure Portal
For visual deployment with step-by-step wizard:
📚 Portal Quickstart: https://learn.microsoft.com/en-us/azure/openshift/quickstart-portal
Portal Deployment Steps:
- Navigate to Azure Portal → Create a resource → Search “Azure Red Hat OpenShift”
- Fill in basics (subscription, resource group, cluster name, region)
- Configure networking (VNet, subnets, visibility)
- Configure authentication (managed identity or service principal)
- Review and create
Deployment Validation
Regardless of deployment method, validate your cluster:
Expected deployment time: 30-45 minutes
-
Create ARO Cluster with Service Principal
Post-Deployment Validation
After cluster creation completes, validate everything is working correctly.
-
Verify Cluster Status
-
Get Cluster Credentials
-
Get API Server and Console URLs
-
Login to Cluster
For Private Clusters:
- Must be connected via VPN, ExpressRoute, or Bastion
- See Optional: Private Cluster Access
-
Verify Cluster Operators
-
Verify Nodes
-
Verify Cluster Version
-
Access Console
Initial Configuration
Essential configurations to establish immediately after deployment:
-
Enable User Workload Monitoring - Create ConfigMap in
openshift-monitoringnamespace ( guide ) -
Deploy Cluster Logging Operator - Install operator and create ClusterLogging instance ( guide )
-
Using Cluster Logging Forwarder in ARO with Azure Monitor (Optional) - Install operator for native forwarding to Azure Monitor and Azure Log Analytics ( guide )
-
Enable API Audit Logging - Update APIServer resource with audit policy (Default, WriteRequestBodies, or AllRequestBodies) ( guide )
-
Create Admin Users/Groups - Set up proper admin access via Azure AD or your IdP, then disable kubeadmin account ( guide )
⚠️ IMPORTANT: Only disable kubeadmin after confirming alternative admin access works.
Optional: Custom Domain Configuration
To use a custom domain instead of the default *.aroapp.io:
- Get cluster IP addresses (API server and ingress IPs)
- Create DNS A records (
api.<domain>and*.apps.<domain>) - Update API server certificate with custom TLS cert
- Update ingress controller certificate with wildcard TLS cert
Complete guide: Custom Domain Configuration
Optional: Private Cluster Access
For private clusters, establish access to the API server and console:
Access Options
| Method | Use Case | Setup Complexity |
|---|---|---|
| Point-to-Site VPN | Remote access, multiple users | Medium (30-45 min gateway creation) |
| Azure Bastion | Browser-based access via jump box | Low |
| ExpressRoute/Site-to-Site VPN | Enterprise connectivity | High |
| Jump Box VM | Simple solution for testing | Low |
Detailed setup guides:
Option 3: ExpressRoute
For production environments with on-premises connectivity:
- Set up ExpressRoute Circuit
- Work with network team to provision ExpressRoute circuit
- Connect VNet to ExpressRoute gateway
- Configure BGP peering
- See: https://docs.microsoft.com/azure/expressroute/
Optional: Private Cluster without Public IP
Create a fully private ARO cluster with NO public IP address using User-Defined Routing (UDR). This is required for organizations with strict security policies prohibiting public IPs.
⚠️ IMPORTANT: This configuration requires advanced networking knowledge. You are fully responsible for egress routing.
Prerequisites:
- Private API server (
--apiserver-visibility Private) - Private ingress (
--ingress-visibility Private) - Pre-configured route table with routes to Azure endpoints
- Network Firewall or NVA for internet egress (if needed)
Implementation
-
Create Route Table with Required Routes
-
Create Cluster with UDR Outbound Type
-
Configure Egress IPs (Optional)
For private clusters with UDR, you can configure egress IPs per namespace:
References:
- Official Guide: https://learn.microsoft.com/en-us/azure/openshift/howto-create-private-cluster-4x
- OpenShift Egress IPs: https://docs.redhat.com/en/documentation/openshift_container_platform/4.20/html/ovn-kubernetes_network_plugin/configuring-egress-ips-ovn
Optional: Encryption with Customer-Managed Keys
Encrypt ARO cluster disks (OS and data) with your own encryption keys stored in Azure Key Vault. This provides full control over encryption keys but adds operational responsibility.
⚠️ CRITICAL WARNINGS:
- Cannot be enabled on existing clusters - Only during cluster creation
- Only master nodes for new clusters; workers can be added later via MachineSets
- Customer is fully responsible for key maintenance
- Key loss = permanent cluster failure - ARO SREs cannot recover
- Key deletion/disabling = immediate cluster outage
Prerequisites
- Enable EncryptionAtHost Feature
Implementation
-
Step 1: Create Azure Key Vault with Purge Protection
-
Step 2: Create Disk Encryption Set
-
Step 3: Grant DES Access to Key Vault
-
Step 4: Create Cluster with CMK
-
Step 5: Verify Encryption
-
Step 6: Enable CMK for Worker Nodes (Post-Deployment)
To enable CMK on existing or new worker nodes, modify the MachineSet:
Add under
spec.template.spec.providerSpec.value:
Key Maintenance Responsibilities:
- Monitor key expiration and rotation
- Maintain Key Vault availability
- Test disaster recovery procedures
- Document key recovery procedures
- Never delete or disable keys while cluster is running
References:
- Official Guide: https://learn.microsoft.com/en-us/azure/openshift/howto-byok
- Disk Encryption Sets: https://learn.microsoft.com/en-us/azure/virtual-machines/disk-encryption
✅ Day 1 Deployment Complete!
Your ARO cluster is now deployed and validated. Proceed to Part 3: Day 2 Operations to configure and secure your cluster for production use.
Part 3: Day 2 Operations
Day 2 operations cover the configuration, security, and integration tasks performed after initial cluster deployment. Tasks are organized into three tiers based on priority:
- Tier 1 (Critical): Essential for production readiness
- Tier 2 (Standard): Recommended for robust production environments
- Tier 3 (Optional): Enhancements for specific use cases
Tier 1: Critical Operations
These operations are essential for a production-ready ARO cluster.
Identity & Access Management
Azure AD Integration
- Configure Azure AD OAuth - Create Azure AD app, configure OpenID Connect provider in cluster OAuth resource
- Update redirect URI - Add OAuth callback URL to Azure AD app registration
- Test authentication - Verify users can login via Azure AD
Complete guide: Configure Azure AD authentication
RBAC Configuration
- Create groups for different access levels (cluster-admins, developers, viewers)
- Assign cluster roles to groups (
cluster-admin,edit,view) - Create custom roles if built-in roles don’t meet requirements
RBAC guide: OpenShift RBAC
Monitoring & Observability
- Configure Prometheus retention - Update cluster-monitoring-config ConfigMap with retention period and storage (default: 15 days)
- Enable Azure Monitor Container Insights - Create Log Analytics workspace and link to ARO cluster
- Create critical alerts - Define PrometheusRule resources for node health, memory, disk, and application metrics
Monitoring guides:
- Configuring Azure Monitor for Prometheus remove write
- OpenShift Monitoring Stack
- Azure Monitor Integration
Backup & Disaster Recovery
- Install OADP Operator - Deploy OpenShift API for Data Protection from OperatorHub
- Configure Azure Blob Storage - Create storage account and container for backup storage
- Create DataProtectionApplication - Configure Velero with Azure provider and backup locations
- Create backup schedules - Define regular backup schedules for PVs, and cluster resources
- Test restore procedures - Validate backup/restore process in non-production environment
Backup guides:
Backup Schedules
- Create Application Backup Schedule
Security Hardening
Security Context Constraints
Managing security context constraints
-
Review Default SCCs
-
Create Custom SCC (if needed)
Network Policies
- Enable Network Policies for Namespaces
Secrets Management
-
Configure External Secrets
Azure Key Vault CSI on Azure Red Hat OpenShift
[Installing the HashiCorp Vault Secret CSI Driver]https://cloud.redhat.com/experts/misc/secrets-store-csi/hashicorp-vault/
*Note: other methods can be use, these are just two common methods
Tier 2: Standard Operations
These operations are recommended for robust production environments.
Egress Restrictions and Firewall Configuration
Control and monitor outbound traffic from your ARO cluster using Azure Firewall, NVA, or User-Defined Routes.
Egress Lockdown Feature
With the Egress Lockdown feature (enabled by default on newer clusters), ARO clusters proxy all required Azure/Red Hat connections through the ARO service. This eliminates the need for direct internet access for core cluster operations.
Endpoints Automatically Proxied (no firewall rules needed):
| Endpoint | Purpose |
|---|---|
arosvc.azurecr.io |
ARO system container images |
arosvc.<region>.data.azurecr.io |
Regional system container images |
management.azure.com |
Azure Resource Manager APIs |
login.microsoftonline.com |
Azure AD authentication |
*.monitor.core.windows.net |
Geneva monitoring (Microsoft) |
*.monitoring.core.windows.net |
Geneva monitoring (Microsoft) |
*.blob.core.windows.net |
Geneva monitoring storage |
*.servicebus.windows.net |
Geneva monitoring service bus |
*.table.core.windows.net |
Geneva monitoring tables |
Optional Endpoints for Additional Features
If you want additional features (OperatorHub, Red Hat Telemetry, cluster updates), allow these endpoints in your firewall:
-
Red Hat Container Registries (for OperatorHub)
-
Red Hat Telemetry (opt-in only)
Note: Clusters are opted-out by default. To opt-in, update your pull secret.
-
OpenShift Updates
-
Third-Party Container Registries
Azure Firewall Configuration Example
- Create Azure Firewall
- Create Firewall Application Rules
- Create Route Table to Force Traffic Through Firewall
References:
- Egress Lockdown: https://learn.microsoft.com/en-us/azure/openshift/concepts-egress-lockdown
- Restrict Egress: https://learn.microsoft.com/en-us/azure/openshift/howto-restrict-egress
- Azure Firewall: https://learn.microsoft.com/en-us/azure/firewall/
DNS Forwarding Configuration
Configure custom DNS forwarding to allow pods to resolve names from private DNS servers or custom domains.
Use Cases
- Resolve on-premises DNS names from pods
- Integrate with Azure Private DNS Zones
- Use custom/private DNS servers
- Resolve names from peered VNets with custom DNS
Configuration
ARO uses CoreDNS. Configure forwarding by modifying the DNS operator (oc edit dns.operator/default):
- Specific domains: Forward select zones to custom DNS servers
- Global forwarding: Forward all non-cluster queries to custom servers
- Azure Private Link: Forward
privatelink.*zones to Azure DNS (168.63.129.16) - DNS caching: Configure TTL for successful/denied responses
Complete guide: DNS Forwarding on ARO | Configure Custom DNS
Troubleshooting DNS
Quick diagnostics:
Common issues:
- DNS timeout → Check firewall allows UDP/53 to upstream DNS
- Custom domains not resolving → Verify zones in DNS operator config
- Slow resolution → Enable DNS caching
References:
Cluster Maintenance and Upgrades
For production clusters, open a proactive support case
Keep your ARO cluster up-to-date with the latest OpenShift features, security patches, and bug fixes.
Understanding ARO Version Support
- Support Policy: ARO supports current (n) and previous (n-1) OpenShift minor versions
- Version Lifecycle: Versions typically supported for 12-18 months after release
- Monthly Updates: Security and bug fix updates released monthly (z-stream)
- EUS Channels: Extended Update Support available for select versions (4.16, 4.18, 4.20, etc.)
Check ARO Lifecycle: https://learn.microsoft.com/en-us/azure/openshift/support-lifecycle
- Check Available Versions for Your Region
Pre-Upgrade Checklist
- Verify cluster health (
oc get clusteroperators,oc get nodes) - Check credentials - Verify managed identity role assignments or SP expiration
- Backup critical data - PVs, configurations (use OADP if configured)
- Review release notes - Check for breaking changes and deprecated APIs
Upgrade Methods
| Method | Use Case | Documentation |
|---|---|---|
| OpenShift Console | Interactive upgrades | Navigate to Administration → Cluster Settings |
CLI (oc adm upgrade) |
Scripted upgrades | CLI Upgrade Guide |
Quick CLI upgrade:
EUS-to-EUS Upgrades
⚠️ Must upgrade through intermediate versions (e.g., 4.16 → 4.17 → 4.18)
Example: 4.16 → 4.18 requires: change to stable-4.17 → upgrade → change to eus-4.18 → upgrade
Post-Upgrade Validation
References:
- Upgrade Guide: https://learn.microsoft.com/en-us/azure/openshift/howto-upgrade
- OpenShift Updates: https://docs.redhat.com/en/documentation/openshift_container_platform/latest/html/updating_clusters/
- Upgrade Graph Tool: https://access.redhat.com/labs/ocpupgradegraph/
Cluster Configuration Management
Infrastructure Nodes (optional)
- Create infrastructure node MachineSet - Dedicated nodes for cluster components (router, registry, monitoring)
- Move infrastructure components - Update IngressController, ImageRegistry, and monitoring to use infra nodes
Guide: Creating Infrastructure MachineSets
Autoscaling
- Configure ClusterAutoscaler - Set global scaling limits (max nodes, cores, memory)
- Configure MachineAutoscaler - Set per-MachineSet scaling bounds (min/max replicas)
Guide: Cluster Autoscaling
Advanced Storage
Built-in storage classes:
managed-csi- Azure Disk (default)managed-premium- Premium SSDazurefile-csi- Azure Files (RWX support)
Custom storage classes:
- Create custom StorageClasses for specific performance tiers (Premium_LRS, etc.)
- Azure Blob CSI driver for object storage workloads
Storage guides:
Azure Service Integration
Workload Identity for Applications (Recommended for Azure Resource Access)
Workload Identity allows applications running on ARO to securely access Azure resources (Key Vault, Storage, SQL, etc.) without storing credentials in secrets. It uses OIDC federation with managed identities.
How It Works:
- Verify pod-identity-webhook is deployed (ARO prerequisite)
- Create a user-assigned managed identity
- Grant the identity permissions on Azure resources
- Create a Kubernetes ServiceAccount with workload identity annotation
- Create federated identity credential linking ServiceAccount to managed identity
- Deploy application with ServiceAccount and required label
- ARO’s mutating webhook automatically injects Azure credentials
Prerequisites:
- ARO cluster with managed identity enabled
pod-identity-webhookdeployed inopenshift-cloud-credential-operatornamespace
Complete Setup Guide:
Deploy and configure an application using workload identity on an Azure Red Hat OpenShift managed identity cluster
How It Works (Behind the Scenes):
- ✅ Pod-identity-webhook mutates pod spec during creation
- ✅ Kubernetes projects service account token to
/var/run/secrets/azure/tokens/azure-identity-token - ✅ Token expiration: 3600 seconds (1 hour), auto-rotated
- ✅ Azure SDK detects
AZURE_FEDERATED_TOKEN_FILEenvironment variable - ✅ SDK exchanges Kubernetes token for Azure AD access token via OIDC federation
- ✅ Access token has permissions based on managed identity’s role assignments
- ✅ No credentials stored in cluster - tokens are ephemeral and short-lived
Common Use Cases:
- Access Azure Key Vault secrets
- Read/write Azure Storage (Blob, Files, Queue, Table)
- Connect to Azure SQL Database with managed identity auth
- Access Azure Service Bus, Event Hubs, Cosmos DB
- Call Azure Resource Manager APIs
Troubleshooting:
References:
- Official ARO Guide: https://learn.microsoft.com/en-us/azure/openshift/howto-deploy-configure-application
- Azure Workload Identity Overview
- Red Hat Managed Identity Guide
Azure Container Registry Integration
Option 1: Workload Identity (Recommended for Managed Identity Clusters)
- Use workload identity to authenticate to ACR without storing credentials. See Workload Identity for Applications section for complete setup.
Option 2: Service Principal Pull Secret (Legacy)
- Configure ACR Pull Secret with Service Principal. See ACR with ARO | Guide on using Azure Container Registry in Private ARO clusters
References:
Cost Optimization
- Resource Quotas - Set namespace-level limits for CPU, memory, PVCs
- LimitRanges - Define default/max container resource requests
- Azure Cost Management - Tag resources, monitor costs, set budgets
- Pod Disruption Budgets - Ensure availability during maintenance
- Right-size VMs - Review node utilization, adjust VM sizes
Cost optimization guide: ARO Cost Management
Tier 3: Optional Enhancements
These enhancements are for specific use cases and advanced requirements.
AI/ML and Advanced Workloads
For GPU workloads, Red Hat OpenShift AI, and advanced compute scenarios, see specialized guides:
GitOps & CI/CD
For ArgoCD, Tekton, and CI/CD integration, see:
- GitOps with OpenShift GitOps (ArgoCD)
- CI/CD with OpenShift Pipelines (Tekton)
- Azure DevOps Integration
- Configuring Cross-Tenant Azure DevOps Access from ArgoCD on ARO
Multi-Cluster Management
For Advanced Cluster Management, Submariner, and multi-cluster setups, see:
- Red Hat Advanced Cluster Management Guide
- Deploying Advanced Cluster Management and OpenShift Data Foundation for ARO Disaster Recovery
Part 4: Operational Excellence (Day N)
Ongoing operations to maintain cluster health and performance.
Daily Operations
Daily health check commands:
Daily tasks:
- Review Prometheus/Azure Monitor alerts
- Check resource utilization trends
- Verify backup completion
- Review failed deployments or restarts
Weekly Operations
- Security updates - Check for cluster updates (
oc adm upgrade), review CVEs - Capacity planning - Review node/storage utilization trends, autoscaler events
- Cost analysis - Review Azure Cost Management, identify anomalies, right-size resources
- Incident review - Document root causes, update runbooks
Monthly Operations
- DR test - Test backup/restore in non-prod
- Performance baseline review - Update baselines, identify degradation patterns
- Documentation updates - Runbooks, diagrams, DR procedures
Quarterly Operations
- Major version upgrade planning - Test in non-prod, schedule maintenance window
- Architecture review - Assess scaling, security posture, new capabilities
- DR drill - Full failover test, measure RTO/RPO
- Training and knowledge sharing - Team training, cross-training, documentation updates
Incident Response
Severity levels: P1 (Critical - immediate), P2 (High - < 1hr), P3 (Medium - < 4hr), P4 (Low - < 1 day)
Escalation: On-call engineer → Team lead → Platform architect → Microsoft/Red Hat support
Example SLA targets:
- Cluster availability: 99.95%
- API response time: < 200ms (p95)
- Pod startup time: < 30s (p95)
Change management:
- Standard changes: Defined maintenance windows
- Emergency changes: As needed with approval
- Freeze periods: Quarter-end, holidays
Appendices
Appendix A: Network Security Groups Deep Dive
This appendix consolidates all Network Security Group (NSG) content for Azure Red Hat OpenShift deployments.
Overview
Network Security Groups control network traffic to and from Azure resources in an Azure virtual network. For ARO clusters, NSGs play a critical role in securing communication between cluster components.
Decision: ARO-Managed vs BYO NSG
| Factor | ARO-Managed NSG (RECOMMENDED) | Bring Your Own NSG (BYO NSG) |
|---|---|---|
| Setup Complexity | ✅ Minimal - ARO creates automatically | ❌ Complex - manual pre-creation required |
| Operational Overhead | ✅ Low - ARO maintains rules | ❌ High - manual rule management |
| Risk of Misconfiguration | ✅ Low - ARO controls rules | ⚠️ High - can break cluster if misconfigured |
| Compliance | Suitable for most environments | Required if pre-creation mandated by policy |
| Customization | Limited (ARO controls priorities 500-3000) | Full control over all rules |
| Troubleshooting | ✅ Easier - known good configuration | ❌ Complex - many possible misconfigurations |
Recommendation: Use ARO-managed NSG unless organizational compliance requires pre-creation of NSGs.
ARO-Managed NSG (Recommended)
When using ARO-managed NSGs:
-
Pre-Deployment:
- Verify no pre-existing NSGs attached to master or worker subnets
- Document that NSGs will be created in the cluster infrastructure resource group
- Plan for limited customization (priorities 3001+ available for custom rules)
-
During Deployment:
- ARO automatically creates NSGs during cluster creation
- ARO creates required security rules (priorities 500-3000)
- ARO attaches NSGs to subnets
-
Post-Deployment:
-
Verify NSG creation:
-
View ARO-managed rules:
-
BYO NSG (Bring Your Own NSG)
⚠️ WARNING: BYO NSG requires precise configuration. Misconfigured NSGs can prevent cluster deployment or cause operational issues.
Official ARO Guide: Bring Your Own NSG
When to Use BYO NSG
Use BYO NSG only when:
- Organizational security policy requires pre-creation of NSGs in a specific resource group
- Compliance mandates prohibit ARO from creating NSGs in the managed resource group
- You need full control to add/remove NSG rules during the cluster lifetime
Typical Architecture:
General Capabilities and Limitations
Requirements:
- ✅ MUST attach preconfigured NSGs to BOTH master and worker subnets BEFORE cluster creation
- ✅ Can use same NSG or different NSGs for master and worker subnets
- ✅ Can only be enabled at cluster creation time (NOT on existing clusters)
- ✅ Not configurable from Azure Portal (CLI only)
How It Works:
- You create and attach NSGs to subnets before cluster creation
- ARO creates cluster with
--enable-preconfigured-nsgflag - ARO still creates a default NSG in managed resource group BUT doesn’t attach it to subnets
- You can modify your NSGs during cluster lifetime
- You can detach/reattach NSGs at any time (including switching to ARO’s default NSG)
Critical Warnings:
⚠️ Manual NSG Updates Required: When you create Kubernetes LoadBalancer services or OpenShift routes, you MUST manually update NSG rules. ARO does NOT automatically update your preconfigured NSGs (unlike the default ARO-managed NSG).
⚠️ Prohibited DENY Rules: Your NSGs MUST NOT have INBOUND/OUTBOUND DENY rules blocking these traffic flows (will break cluster):
- Master Subnet ↔ Master Subnet (all ports)
- Worker Subnet ↔ Worker Subnet (all ports)
- Master Subnet ↔ Worker Subnet (all ports)
⚠️ NSG Flow Logs: If using BYO NSG with flow logs, use NSG Flow Logs documentation (not the generic flow log docs).
BYO NSG Planning Checklist
- Understand you must manually update NSG rules for LoadBalancer services and routes
- Verify no DENY rules will block master↔master, worker↔worker, or master↔worker traffic
- Plan for NSG flow logs for troubleshooting
- Review OpenShift network flows for minimal permissive rules
- Create testing procedure before production deployment
BYO NSG Implementation Guide
Step 1: Create VNet and Subnets
- Create VNet and Subnets:
Step 2: Create and Configure Preconfigured NSGs
Option A: Start with Default Rules (Recommended)
- Create NSGs with Azure default rules:
Option B: Start with No Rules (Advanced)
- Create empty NSGs:
Step 3: Attach NSGs to Subnets
CRITICAL: NSGs MUST be attached BEFORE cluster creation.
-
Attach Master NSG to Master Subnet:
-
Attach Worker NSG to Worker Subnet:
Step 4: Create ARO Cluster with BYO NSG
-
Create cluster with preconfigured NSG feature:
Key Points:
--enable-preconfigured-nsgflag is REQUIRED to use BYO NSG- If managed identity cluster: add managed identity flags
- If service principal cluster: add
--client-idand--client-secret - Cluster creation will fail if NSGs are not attached to both subnets
-
Verify cluster creation:
Step 5: Update NSGs with Required Rules
After cluster creation, update your NSGs based on cluster requirements:
-
Required rules for public cluster access:
-
Examine default NSG for reference:
-
Example: Add rule for LoadBalancer service:
When you create a Kubernetes LoadBalancer service, you MUST manually add NSG rule:
Important NSG Rule Guidelines:
See OpenShift Network Flows for complete port requirements.
AVOID these DENY rules (will break cluster):
- Master Subnet ↔ Master Subnet
- Worker Subnet ↔ Worker Subnet
- Master Subnet ↔ Worker Subnet
Step 6: Enable NSG Flow Logs (Recommended)
NSG flow logs are critical for troubleshooting BYO NSG configurations.
⚠️ Important: Use NSG Flow Logs for Network Security Groups documentation (not generic flow log docs).
- Enable flow logs:
BYO NSG Day 2 Operations
Manual NSG Updates for LoadBalancer Services and Routes
⚠️ CRITICAL: ARO does NOT automatically update your preconfigured NSGs when you create LoadBalancer services or OpenShift routes. You MUST update NSG rules manually.
-
When creating LoadBalancer services:
-
Check default NSG for automatic updates:
Monitor for Misconfigured Rules
Azure Monitor can alert on misconfigured NSG rules that interfere with cluster operations.
-
Check for NSG configuration signals:
-
Review NSG Flow Logs for denied traffic:
Regular Maintenance
-
Verify no DENY rules blocking cluster traffic:
-
Audit Rule Effectiveness:
Adding Application-Specific Rules
-
Use Priority Range 3001+ for Custom Rules:
-
Document Each Custom Rule:
- Create documentation spreadsheet with:
- Rule name
- Priority
- Purpose
- Business justification
- Date added
- Owner
- Create documentation spreadsheet with:
NSG Monitoring and Alerts
-
Enable Diagnostic Logs:
-
Create Alerts for NSG Changes:
Critical Warnings for BYO NSG
⚠️ NEVER:
- Delete ARO-required rules (priorities 500-3000)
- Modify master-to-worker or worker-to-master communication rules
- Remove AzureLoadBalancer service tag rules
- Change rule priorities in the 500-3000 range
⚠️ ALWAYS:
-
Test rule changes in non-production environment first –nsg-name
–query “[?access==‘Deny’]”
-o tableLook for DENY rules blocking master↔master, worker↔worker, master↔worker
-
Document all custom rules:
- Maintain a change log for NSG rule modifications
- Document purpose and requester for each custom rule
- Keep NSG flow logs enabled for troubleshooting
-
Optional: Switch NSGs:
You can detach your preconfigured NSG and attach a different NSG (or the default ARO NSG):
NSG Rule Reference
For complete NSG rule requirements, refer to:
- The default NSG created in your cluster’s managed resource group (use as template)
- OpenShift Network Flow Matrix
- ARO BYO NSG Official Guide
Key requirements:
- Allow master ↔ master communication (all ports)
- Allow worker ↔ worker communication (all ports)
- Allow master ↔ worker communication (all ports)
- Allow Azure Load Balancer health probes
- For public clusters: Allow Internet → port 6443 (API) and ports 80/443 (router)
Appendix B: Certificate Management
This appendix provides comprehensive guidance on TLS certificate management for ARO clusters.
Overview
ARO clusters use TLS certificates for:
- API Server: Secures the Kubernetes API endpoint
- Ingress Controller: Secures application routes (*.apps domain)
- Internal Components: Service mesh, operators, monitoring
Certificate Management Options
| Option | Automation | Complexity | Cost | Recommended For |
|---|---|---|---|---|
| cert-manager | ✅ High | Medium | Free (Let’s Encrypt) | Production, automated renewal |
| Manual Certificates | ❌ Low | Low | Varies | Simple deployments, custom CA |
| Azure Key Vault | ⚠️ Partial | High | $$$ | Enterprise, integration with Azure |
Option 1: cert-manager (Recommended)
cert-manager automates certificate issuance and renewal using various CA providers including Let’s Encrypt, Azure Key Vault, and HashiCorp Vault.
cert-manager will automatically:
- Create a Certificate resource
- Issue certificate from Let’s Encrypt
- Store in a Secret
- Update the Route with the certificate
- Verify Route Certificate:
Certificate Monitoring
-
Monitor Certificate Expiration:
-
Create Alert for Expiring Certificates:
Option 2: Manual Certificate Management
For simple deployments or when using a corporate CA.
API Server Certificate
This is managed by the ARO service. To request an update to Azure Red Hat OpenShift cluster certificates follow this Guide
Ingress Controller Certificate
-
Obtain Wildcard Certificate from CA:
- CN:
*.apps.<cluster-domain>.com - SAN:
*.apps.<cluster-domain>.com
- CN:
-
Create Secret in openshift-ingress:
-
Patch Ingress Controller:
*Note: the default IngressController is managed by the ARO service. To request an update to Azure Red Hat OpenShift cluster certificates follow this Guide
Appendix C: Troubleshooting Guide
Comprehensive troubleshooting for common ARO issues. ARO is a managed service, you can always open a support case. Open a support case with Red Hat
NSG Troubleshooting
See Appendix A: Network Security Groups Deep Dive for NSG-specific troubleshooting.
Authentication & RBAC Issues
Issue: Unable to Login with Azure AD
Symptoms:
- OAuth login fails
- “Invalid client” or “redirect URI mismatch” errors
- Users can’t authenticate after Azure AD configuration
Resolution:
Issue: User Has No Permissions After Login
Symptoms:
- User can login but sees “Forbidden” errors
- User not in expected groups
- RBAC not working as configured
Resolution:
Issue: Service Account Permission Errors
Symptoms:
- Pods fail with “Forbidden” errors
- Service account can’t access resources
- CI/CD pipeline fails due to permissions
Resolution:
Operator Health Issues
Issue: Cluster Operators Degraded
Symptoms:
oc get coshows operators with DEGRADED=True- Cluster functionality impaired
- Warnings or errors in cluster operator status
Resolution:
Storage Issues
Issue: PV Provisioning Failures
Symptoms:
- Pods stuck in
Pendingstate - PVCs not bound
- Events show “Failed to provision volume”
Resolution:
Issue: PV Not Mounting to Pod
Symptoms:
- Pod stuck in
ContainerCreating - Events show “Unable to mount volume”
- MountVolume.SetUp failed
Resolution:
Scaling Issues
Issue: Cluster Autoscaler Not Scaling
Symptoms:
- Pods pending but no new nodes created
- ClusterAutoscaler not adding nodes
- MachineSet not scaling despite demand
Resolution:
Issue: Nodes Stuck in NotReady
Symptoms:
oc get nodesshows NotReady state- Workloads not scheduling on node
- Node conditions show problems
Resolution:
ARO is a managed service, you can always open a support case. Open a support case with Red Hat
Networking Issues
Issue: Pod-to-Pod Communication Failures
Symptoms:
- Services can’t reach other services
- Network policy blocking traffic
- DNS resolution failures
Resolution:
Issue: External Connectivity Problems
Symptoms:
- Pods can’t reach internet
- Egress traffic blocked
- DNS lookups to external domains fail
Resolution:
Performance Issues
Issue: High API Server Latency
Symptoms:
occommands slow- Timeouts accessing API
- Applications experiencing slow Kubernetes API calls
Resolution:
ARO is a managed service, you can always open a support case. Open a support case with Red Hat
Issue: High Worker Node CPU/Memory
Symptoms:
- Nodes at high utilization
- Pods being evicted
- Performance degradation
Resolution:
General Troubleshooting Commands
ARO is a managed service, you can always open a support case. Open a support case with Red Hat
Appendix D: Reference Information
Azure Built-in Roles for ARO Managed Identities
| Role Name | Role ID | Purpose | Typical Scope |
|---|---|---|---|
| Azure Red Hat OpenShift Federated Credential | ef318e2a-8334-4a05-9e4a-295a196c6a6e | Manage federated credentials for platform identities | Cluster identities (all 8) |
| Azure Red Hat OpenShift Cloud Controller Manager | a1f96423-95ce-4224-ab27-4e3dc72facd4 | Manage load balancers, public IPs, and cloud resources | Subnets (master, worker) |
| Azure Red Hat OpenShift Cluster Ingress Operator | 0336e1d3-7a87-462b-b6db-342b63f7802c | Manage ingress resources and load balancers | Subnets (master, worker) |
| Azure Red Hat OpenShift Disk Storage Operator | (varies) | Manage disk storage resources | Managed resource group |
| Azure Red Hat OpenShift File Storage Operator | 0d7aedc0-15fd-4a67-a412-efad370c947e | Manage file storage resources | VNet, NSG (if BYO) |
| Azure Red Hat OpenShift Image Registry Operator | 8b32b316-c2f5-4ddf-b05b-83dacd2d08b5 | Manage image registry storage | VNet |
| Azure Red Hat OpenShift Machine API Operator | 0358943c-7e01-48ba-8889-02cc51d78637 | Create and manage virtual machines | Subnets (master, worker) |
| Azure Red Hat OpenShift Network Operator | be7a6435-15ae-4171-8f30-4a343eff9e8f | Manage networking resources | VNet |
| Azure Red Hat OpenShift Service Operator | 4436bae4-7702-4c84-919b-c4069ff25ee2 | Manage ARO service resources | Subnets (master, worker), NSG (if BYO) |
Note: These are ARO-specific built-in roles automatically assigned when using managed identities. They follow the principle of least privilege.
Required Azure Endpoints and FQDNs
ARO clusters require outbound connectivity to the following endpoints:
Microsoft Azure Endpoints
| Endpoint | Port | Protocol | Purpose |
|---|---|---|---|
*.blob.core.windows.net |
443 | HTTPS | Azure Blob Storage |
*.table.core.windows.net |
443 | HTTPS | Azure Table Storage |
*.servicebus.windows.net |
443 | HTTPS | Azure Service Bus |
management.azure.com |
443 | HTTPS | Azure Resource Manager |
login.microsoftonline.com |
443 | HTTPS | Azure AD authentication |
*.azmk8s.io |
443 | HTTPS | AKS/ARO management |
Red Hat Endpoints
| Endpoint | Port | Protocol | Purpose |
|---|---|---|---|
quay.io |
443 | HTTPS | Red Hat container registry |
*.quay.io |
443 | HTTPS | Red Hat container registry (CDN) |
registry.redhat.io |
443 | HTTPS | Red Hat container registry |
sso.redhat.com |
443 | HTTPS | Red Hat SSO |
api.openshift.com |
443 | HTTPS | OpenShift cluster manager |
console.redhat.com |
443 | HTTPS | Red Hat Hybrid Cloud Console |
OpenShift/Kubernetes Endpoints
| Endpoint | Port | Protocol | Purpose |
|---|---|---|---|
registry.access.redhat.com |
443 | HTTPS | Container images |
*.registry.access.redhat.com |
443 | HTTPS | Container images (CDN) |
docker.io |
443 | HTTPS | Docker Hub (public images) |
gcr.io |
443 | HTTPS | Google Container Registry |
ghcr.io |
443 | HTTPS | GitHub Container Registry |
Azure Monitor / Telemetry (if using Azure Monitor)
| Endpoint | Port | Protocol | Purpose |
|---|---|---|---|
*.ods.opinsights.azure.com |
443 | HTTPS | Azure Monitor data ingestion |
*.oms.opinsights.azure.com |
443 | HTTPS | Azure Monitor management |
*.monitoring.azure.com |
443 | HTTPS | Azure Monitor |
Note: Use Azure Firewall application rules or NSG service tags where possible instead of allowing individual FQDNs.
Supported Azure VM Sizes for ARO
See: https://docs.microsoft.com/azure/openshift/support-policies-v4#supported-virtual-machine-sizes
Master Nodes (Control Plane)
Requirements:
- Minimum 8 vCPU, 32 GB RAM
- Premium SSD support required
- Always 3 master nodes (cannot be changed)
Worker Nodes (Compute)
- Minimum of 3
Supported OpenShift Versions
Check available versions for your region:
Version Support Policy:
- ARO supports n and n-1 OpenShift versions
- Versions typically supported for 12-18 months after release
- Regular updates released monthly
- End-of-life versions deprecated with advance notice
Check lifecycle: https://learn.microsoft.com/en-us/azure/openshift/support-lifecycle
Default Network CIDRs
| Network | Default CIDR | Purpose | Configurable |
|---|---|---|---|
| Pod Network | 10.128.0.0/14 | Pod IP addresses | Yes (at cluster creation only) |
| Service Network | 172.30.0.0/16 | Service ClusterIPs | Yes (at cluster creation only) |
| VNet | (user-defined) | Azure VNet | Yes |
| Master Subnet | (user-defined, min /27) | Control plane nodes | Yes |
| Worker Subnet | (user-defined, min /27) | Worker nodes | Yes |
Important:
- Pod and Service CIDRs cannot be changed after cluster creation
- Ensure no overlap with VNet, peered VNets, or on-premises networks
- Minimum subnet sizes:
- Master: /27 (32 IPs, 27 usable after Azure reservations)
- Worker: /27 minimum, /24 recommended for scaling
Useful Links
Official Documentation
- ARO Documentation: https://docs.microsoft.com/azure/openshift/
- OpenShift Documentation: https://docs.openshift.com/
- ARO GitHub: https://github.com/Azure/ARO-RP
- Azure CLI Reference: https://docs.microsoft.com/cli/azure/aro
Managed Identity Resources
- ARO Managed Identity Guide: https://learn.microsoft.com/en-us/azure/openshift/howto-understand-managed-identities
- Create ARO with Managed Identity: https://learn.microsoft.com/en-us/azure/openshift/howto-create-openshift-cluster
- Azure Managed Identity Docs: https://learn.microsoft.com/en-us/entra/identity/managed-identities-azure-resources/
Support & Community
- Red Hat Customer Portal: https://access.redhat.com/
- Red Hat Hybrid Cloud Console: https://console.redhat.com/
- ARO Support: Azure Portal > Support + troubleshooting
- OpenShift Community: https://www.openshift.com/community
Training & Certification
- Red Hat OpenShift Training: https://www.redhat.com/en/services/training/all-courses-exams
- Microsoft Learn - ARO: https://learn.microsoft.com/training/browse/?products=azure-red-hat-openshift
- OpenShift Interactive Learning: https://learn.openshift.com/